How to get started with Android studio , full steps with pictures...
How to assign own shortcut key to any software in windows os.
How to assign own shortcut key to any software in windows 10,7 or 8.
Yeah it's true that you can assign own shortcut key to any software if you are in windows 10, 7 or 8 .it's an inbuilt feature of Windows operating system so you don't need any other software to do the same . Just do some steps and done . It is a very good feature for those wanted to save their time for launching any software or don't have enough time to launch software from start menu , with this you can launch your software while working on other projects .
Shortcut key means pressing some combination of keys in keyboard to launch the particular software.
So let's assign a shortcut key to a software. The whole process is given below. Have patience and follow the steps.
STEP :- [1]
First of all think of a software to which you want to assign a shortcut key means the software to which you want to assign a shortcut key must have a shortcut on desktop of your pc. If not create the shortcut of that software. By default every software you install on pc have a shortcut on desktop. Like given in the picture below for instance we will assign a shortcut key to a software named 'mini partition tool'.
STEP :- [2]
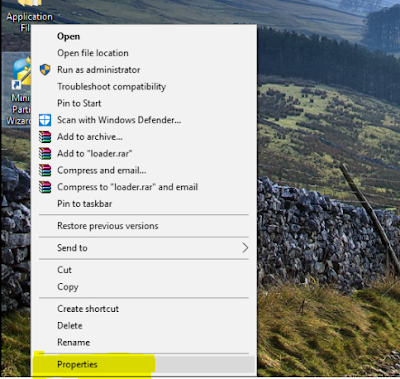
Now right click on the software shortcut means the software to which you wanted to assign a shortcut key that is mini tool partition in our example. Then many option will pop-up like open ,cut ,copy ,paste Etcetra. At the very down position of pop-up options you will see option named 'properties'. Just click on the properties option. The options are similar as seen in the picture below.
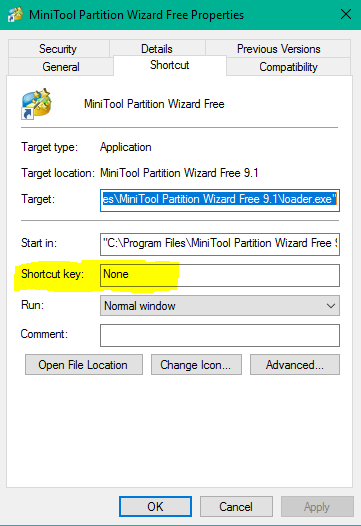
Now properties window will popup which has many tabs click on shortcut tab as seen in the picture below. In this tab you will notice that it has a option named 'shortcut key' which will have a empty input field or written None in the empty field. The similar option is given in the picture below on which shortcut key option is yellow marked.
STEP :- [3]
Now last step but not the least. Just click on empty field in front of shortcut key option and enter any key which you want to assign as shortcut key to that particular software. Remember only alphabet or numbers key and also combination of that typed key plus 'Alt' key plus 'CTRL' act as shortcut key for that software. For example in the picture below it is seen when I typed 'M' key then in the input field automatically 'ALT+ CTRL+M' comes in input field. This means combination of 'ALT and CTRL' is compulsory. Now for me whenever I will type the combination of ' ALT+CTRL+M' then the software named 'mini tool partition 'will automatically launch. It saves my lot of times if do same with your software it will save yourself time too.
STEP :- [4]
That's all in this tutorial. I hope you understood this easily because I explain it with pictures and my language is also easy and if found some difficult or hit confused then please give feedback through comment. I will respond to as quickly as possible and remember to keep visiting,save this website as bookmark . Thanks for giving time to me for reading this.
How to install multiple operating system in a single computer
How to install multiple operating system in a single computer.
Well it's everyone's dream to have multiple os installed on a single pc.Because it gives you knowledge of different operating system and different features. Different operating system have different user interface and have different operating speed . There are many os in the market the most famous one is Micro-soft windows and some other are apple's Mac os and others are android , Linux . There is not just five os in market but there is around hundreds of os in the market some name which you never listened before . To install multiple os you don't need anything other than operating system file , Pen-drive , CD to burn operating system inside it , or you can also use pen drive and I suggests you to use pen drive because it is very simple process and you can format your pen drive after installation to get your space back and can use pen drive normally. For to burn ISO file in pen drive you need a software named "Rufus" which is just around of few megabytes in size and very simple for use and it is free for use .you can also use windows USB DVD tool for same .
So let's start our tutorial to install multiple os .
STEP :- [1]
First of all you need ISO file of operating system which you want to install but that file must be according to your processor architecture which may be 32bit or 64bit .you can find about your processor architecture in system settings -x86 for 32bit and x64bit for 64 bit. You can take the help of google to download the required os ISO image.
STEP :- [2]
Download the 'Rufus' software. To download it just go to link given below.
Burn the ISO with this into Pen-drive . When you launch this you will see like given below.
STEP :- [3]
Now you need to change setting in boot menu which appears when you press the dedicated by the motherboard company when you start your pc . For example my boot menu comes when I press F2 key during starting pc .some modern pc shows boot menu key when you start your pc . From boot menu you need to change the boot priority to USB or pen-drive .in this option normally cd rom is set by the manufacturer. So you need to change that meeting to USB. Actually this option means which hardware is scanned firstly for booting. So set USB in this option .
STEP :- [4]
Now you need to put pen drive into USB hub of the pc or laptop and then start you pc laptop and then it will ask you to press any key to boot from the device simply you just have to press any key from the keyboard and now your installation started .
STEP :- [5]
Now it will ask you to whether upgrade you existing os or install it customly means on different drive. You should know that when you select it will just replace existing os. So select custom option from here and then you have to select on which disk you want to install it. Remember select different disk than the previous installed os because this option will make your pc multi boot. You can install as much as os you want maybe infinite all you need different partition with sufficient storage as required by os. From here all done a you have to do keep pressing next option when asked because it will just ask your username and password if you want to apply to it. That's all done .
Now you done. You can select the os on which you want to work or which you want to start during starting you pc . You can select any of os as displayed during starting process.
The menu will look like as seen in the image below
After installation you can format the pen-drive and then you can use it as you using earlier for sharing or many more.
how to install windows with pen drive .
How to Install windows or any other OS with pen drive..

Mostly of us don't know how to install any OS with pen drive . this post is for them who never installed windows or any other OS from removable drive. but the people who never installed one found it very difficult. But installation with CD is very easy just who have to download the ISO image of Windows burn it on CD restart your PC and it says to press any key to start installation then after pressing key your installation started . But with pen drive method is also same with that of CD method except you need only a software named Rufus or window's own software to burn ISO image in pen-drive .it is not difficult than it looks so. Well for these you have so some steps and needs some setting to be changed in BIOS menu that's all nothing more than this . so let's starts with step wise..
STEP :- [1]
First of all you need a pen drive of the size greater than the size os image which you want to install . For example normally size of windows 10 multi architecture is more than 4GB so you need a pen-drive of 8GB or more .
Remember to format the pen-drive before starting the installation process. if you have useful information in pen-drive then you need to move that data in any other locations like in hard-disk , another pen-drive .
STEP :- [2]
Now you need a software named as "RUFUS" which you can download from the link given below. This download link is official link.
DOWNLOADWhen you launch this software it will look like this screen-shot given above. It is not installation software. It don't install on your pc but you have to start it every time through the downloaded file.
STEP :- [3]
Now I suppose you have ISO image file of operating system to be burn in pen-drive . If you don't have yet then you can download by searching in google for instance if you need windows 10 ISO image file then simply type ''download windows 10 ISO '' in google search box . There are many free OS in the market you can get their ISO file free some of them are Linux , Debian , boss etc.
STEP :- [4]
Now all you need to open Rufus software and select ISO image file in this . For this you have to click on the CD-ROM given in middle right side in Rufus like as seen in picture below simply click on that icon and browse for required ISO image file in your directories and click OK . Remember to keep all other settings as like as given in picture below and then click on start .
STEP :- [5]
Now it will give you some warning just keep clicking on continue or OK button . It will take about 30 minutes depending on the size of ISO file . Bigger the size of image file more the time will take . When it will done just close all the files and restart your PC and get into boot menu . Boot menu is the menu where all the settings regarding your computers booting is kept. Where we reach mostly by pressing DEL or F2 key just after when you turn on your CPU or when you see your computer manufacturer s logo .
STEP :- [6]
In bios menu go to boot settings tab and then go to boot priority option and select USB in this option. If you don't found boot settings tab then simply search for boot priority option in bios menu. Now all done and save these settings and restart you PC or laptop.
In the pictures given I shown how to set boot priority to remove able media in my PC .
Now it will ask to press any key to boot like it used to ask when booting from CD-ROM . Simply press any key and all done . Now install like normally you used to do with CD-ROM .
Subscribe to:
Posts (Atom)


