☰ Menu

LEARN C PROGRAMMING LANGUAGE

WELCOME

LEARN C PROGRAMMING LANGUAGE

Welcome to JAAT-STUFF's free C programming language course.  
We brought to you the best c programming language tutorials. These tutorials are for both beginner and advanced programmer. We presented every topic with pictures so that one could easily understand and we all know that visual memory is the best memory,so we created every topic in such a way anyone can understand, Moreover the language is too easy. It is advised to read from beginning to last for better understanding. If you have problem anywhere in understanding you can ask through comment or contact-us.

  
        Table Of Contents

[1]   Introduction

[2] Environment setup

HOW TO CREATE A RESTORE POINT OF YOUR SYSTEM .

HOW TO CREATE A RESTORE POINT OF YOUR SYSTEM.

WELL EVERY OS THAT ARE IN THE MARKET IN THESE DAYS HAVE A INBUILT FEATURE OF CREATING A RESTORE POINT OF YOUR SYSTEM SO THAT YOU CAN RESTORE YOUR SOFTWARE IN CASE YOU UNINSTALLED THEM AND YOU NEED THEM. THEN THERE IS NO WAY OTHER THAN RESTORING THEM . IN RESTORE POINT YOU CREATE A BACKUP OF ALL YOUR SOFTWARE  THAT ARE INSTALLED IN A PARTICULAR DRIVE . BY DOING RESTORE ALL YOUR SOFTWARE THAT ARE INSTALLED DURING THE CREATION OF RESTORE POINT WILL BE RESTORED BUT THE SOFTWARE THAT WERE INSTALLED AFTER THE CREATION OF RESTORE POINT WILL BE DELETED OR UNINSTALLED SO YOU HAVE TO MAKE RESTORE POINT EVERY TIME INSTALL A NEW SOFTWARE OR DO CHANGES TO EARLIER ONE . AT LAST WE CAN SAY THAT SYSTEM RESTORE TAKES YOUR PC BACK IN TIME .SO IT WORKS LIKE A TIME MACHINE FOR YOUR PC . IT TAKES YOUR P IN THE PAST. IT IS HELPFUL IN CASE YOUR PC IS NOT WORKING WELL DUE TO SOFTWARE PROBLEM WHICH OCCURS WHEN YOUR PC IS AFFECTED BY COMPUTER VIRUS . THEN JUST RESTORE YOUR SYSTEM .I WILL GIVE YOU FULL GUIDE TO CREATE A SYSTEM RESTORE POINT.I AM USING WINDOWS 10 IN THIS TUTORIAL.


STEP - [1]
                      FIRST OF ALL GO TO START AND THEN CONTROL PANEL . IT IS NORMALLY FOUND IN START <ALL APPS <WINDOWS SYSTEM. A SCREENSHOT IS GIVEN BELOW OF BOTH THE PATH WHERE YOU CAN FIND THE CONTROL PANEL.


STEP - [2]
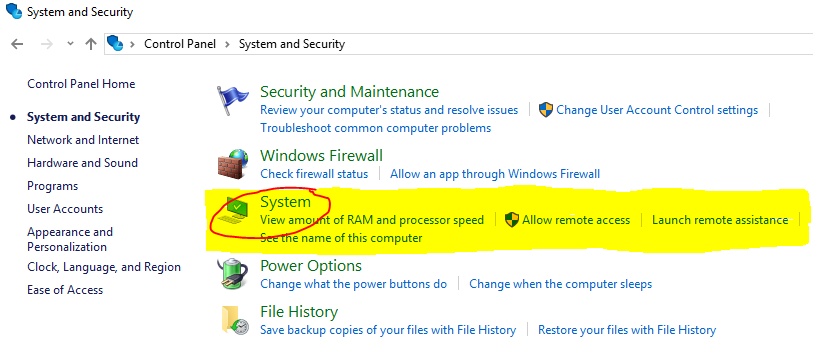
          AFTER OPENING OF CONTROL PANEL YOU WILL FIND VERY FIRST OPTION  SYSTEM AND SECURITY CLICK ON THAT. AFTER THAT YOU WILL SEE THE THIRD OPTION STATED AS "SYSTEM" CLICK ON IT. THE SCREENSHOT OF THIS STEP IS GIVEN BELOW .


STEP - [3]
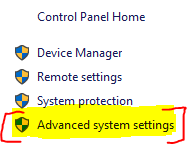
                  NOW YOU WILL SEE INFORMTION ABOUT YOUR PC . HERE YOU GET FOUR OPTIONS ON THE LEFT SIDE OF OPENED WINDOWS AS SHOWN IN SCREENSHOT BELOW.ALL YOU HAVE TO DO IS TO SELECT THE FOURTH OPTION NAMES AS "ADVANCED SYSTEM SETTINGS " .

STEP - [4]
                 NOW A NEW WINDOW WILL POP-UP SHOWING SOME TABS . FROM THESE TABS SELECT  THE TAB NAMED AS "SYSTEM PROTECTION" . THE OPENED WINDOWS IS GIVEN IN THE SCREENSHOT . AFTER SELECTING THE SYSTEM PROTECTION TAB THEN YOU WILL SEE A BUTTON NAMED AS "CREATE" JUST ABOVE THE OK-CANCEL BUTTON . CLICK ON THAT BUTTON .


STEP - [5]
                  AFTER CLICKING ON CREATE BUTTON .IT WILL ASK YOU TO GIVE A NAME TO YOUR RESTORE POINT SO THAT YOU CAN IDENTIFY THE REQUIRED RESTORE POINT FROM THE LIST OF ALL RESTORE POINT WHEN YOUR GOING TO RESTORE YOUR PC. IN THE SCREENSHOT BELOW I GIVEN THE NAME "FIRST RESTORE" . AFTER GIVING NAME SIMPLY SELECT CREATE BUTTON.


STEP - [6]
                 AFTER SELECTING CREATE BUTTON IT WILL TAKE AROUND FEW SECONDS OR AROUND A MINUTE DEPENDING ON THE SIZE OF DRIVE USED BY SOFTWARE .
THE TWO SCREENSHOT IS GIVEN BELOW ON IS SHOWING THAT IT IS CREATING RESTORE POINT  AND OTHER IS SAYING THAT "THE REATORE POINT WAS CREATED SUCCESSFULLY" .


CONGRATULATIONS YOU MADE IT . YOU JUST CREATED SYSTEM RESTORE POINT .


Forward

HOW TO DISABLE THE START-UP PROCESSES OR SOFTWARE.

HOW TO DISABLE THE START-UP PROCESSES OR SOFTWARE.


We all aware about the start-up software and processes that get started when you starts the computer.These process or software makes your operating system to load slowly because these keep running during starting of computer and make it slow to start.Thus it takes time in starting up.the main of these processes are is the long time taken by the windows or any other operating system to load.The main difference between the process and software is that processes runs in background users can't see their results but software runs in foreground and users can see their results.Usually any operating system takes less than a minute to start-up but if there are many processes which have start-up enabled then it will takes long time to start-up because first operating system loads the processes into computer memory.Mostly these processes are software updater ,antivirus,download manager .The good thing is that we can disable these processes and software.I will tell you with screenshot on how to disable these processes so that you all understand it easily.I'm here is just to make everybody know.If you are worrying that it may make your system unstable.Don't worry about that nothing happen to your system.It will have high speed ,less booting time than before.If by chance something happens to your system you can revert the changes means you can enable the process which we will disable.I will guide you throughout the process.   

so Let's start our tutorial on "How to disable the start-up software and processes".


STEP :-[1]

            First of all you need to go to your PC's desktop.The very first screen which shows when you computer starts up.As shown in the screenshot below.If your are not at desktop you just click the button given on the task-bar at the very right side consecutive to date and time.


STEP :-[2]                                  Now take the cursor to the 'task-bar' the down strip on which running software or programs shows up it has start button on the very left side followed by file explorer ,edge and many more programs and it has date-time box the right side followed by desktop button.After that right click on the task-bar.just go to the empty area of task-bar and right click there ,it will show some option.Watch-out the screenshot below.


       STEP :-[3]

STEP :-[3]                                             After right clicking on the task-bar you will see some options vertically one over one.There will be an option named as "TASK MANAGER".Simply click on it.You can run the same 'Task manager' tool from run.For this go 'START' and open the 'RUN' program.You can also open the 'RUN' program through shortcut key.For this hold the "windows button" in the keyboard and press "R" key.In the Run program type "tskmgr" and it will run the task manager.Firstly given method is simplest to launch the task manager.This is shown in the screenshot below.


STEP :- [4]

                            NOW TASK MANAGER IS OPENED . BUT SOMETIMES IT SHOWS ONLY FEW SETTINGS AND WE NEED TO GET FULL SETTING SO FOR THIS CLICK ON "MORE DETAILS" OPTION THAT WILL BE GIVEN BELOW. THE SCREENSHOT IS GIVEN BELOW.


         STEP :- [5]

                                                          NOW YOU REACHED IN FULL MODE OF TASK MANAGER AND THERE WILL BE FEW VERTICALLY TAB . ONE OF AMONG ALL THE TAB IS "START-UP" NAMED TAB . CLICK ON THAT "START-UP" NAMED TAB. AS SHOWN IN THE SCREENSHOT BELOW .

  
                     STEP :- [6] 

                                       NOW YOU REACHED THE DESTINATION . HERE YOU WILL SEE THE FULL LIST OF ALL THE PROCESSES AND SOFTWARE THAT START-UP ENABLED  AND KEEP RUNNING DURING THE START UP PROCESS OF COMPUTER. NOW CLICK ON THE PROCESS THAT YOU WANT TO DISABLE . I HAVE GIVEN A SCREENSHOT BELOW THAT SHOWS THE START-UP TAB. IN THIS SCREENSHOT YOU WILL SEE THE PROCESSES OF COMPUTER THAT KEEP RUNNING DURING  THE START UP OF WINDOWS. I HAVE SELECTED THE VERY FIRST PROCESS FOR DISABLING.


         STEP :- [7]

        AFTER SELECTING THE PROCESS YOU WILL SEE A OPTION WHICH IS "DISABLE" DOWN OF THE TASK MANAGER WINDOW. SEE THE SCREENSHOT BELOW FOR THE SAME.

STEP :- [8]
                 NOW YOU ARE DONE . BUT IF YOU WANT TO ENABLE THE SAME AGAIN YOU CAN DO IT .JUST THE SELECT THE PROCESS WHICH YOU WANT TO ENABLE. AND THEN YOU WILL SEE THE "ENABLE" WHERE EARLIER WAS DISABLE BUTTON JUST DOWN SIDE OF THE OPEN WINDOW OF TASK MANAGER.


How to make offline installer of Visual studio 2017

HOW TO MAKE OFFLINE INSTALLER OF VISUAL STUDIO 2017.


Well you all heard about visual studio 2017 which was released in March 2017. It is the best of Microsoft having all the tools which is required by developers from universal windows tools to android ,and to ios all tools. It has got everything you need to create great apps for devices or desktop apps, for the web and in the cloud. Write code for iOS, Android, and Windows in one integrated development environment (IDE). Get great IntelliSense, easy code navigation, fast builds, and quick deployment. Visual Studio increases your productivity and makes it easy to do your work alone or as part of a larger team. It comes in three forms namely community for single person which is totally free , professional for professionals which is trial version and enterprise for teams which is also trial version. 


Its offline installer is not launched by the company but one can make full offline installer of any version which may be community , professional or enterprise as with the guide which i will give you in this post.


STEP :- [1] 

                   First of all download the online installer or executable file of  visual studio 2017 . you can download it from the link given below of any version. To download just click on the download button given below the required version .

Download visual studio community :- 


Download visual studio professional :-


Download visual studio enterprise :-


STEP :- [2]  

            Now you got executable file copy and paste that file to the following location:-


           C:\Users\[user name]


here user name means whatever be the name you given to you computer user. The location is also shown in screenshot below.


STEP :- [3]     

           Now go to star menu and open command prompt . after opening of the command prompt type the following command:-


                  vs_community.exe --layout e:\new folder --lang en-US


Here first i typed the name of the file means version of visual studio of which we need to make offline installer. Remember if the file you download in step 1 have the larger name which may be build number then rename that to vs_community if you version is community ,vs_professional if your version is professional and vs_enterprise if your version is enterprise.then i typed [--layout ] and after that the location where you want to save the offline installer .and after that [--lang en-US ] which is the language of visual studio. By default it is install all elements.The example is shown in screenshot below.

STEP :-  [4]    

             After typing the command given in above step Press "Enter key". Now it will ask permission whether to run the software. After that the process starts and it starts downloading. During the process you may see some windows come in and going out. All these are shown in screenshots below :-


The download for full version is about 12 GB but it may vary from PC to PC and it is increasing with new build version. it will took few hours to complete . when it is complete open the folder where you saved the offline installer there you find folder  named as " CERTIFICATES " install those certificates into you PC and after that go down in the folder where you saved the offline installer you will executable file named as the version which you downloaded. Run that file and it will show some options which  are tools like mobile development ,universal development and many more. Select the required tools option and click on install button which will be given below on the same opened window.   

DOWNLOAD GOOGLE CHROME 55.0.2883.87 OFFLINE INSTALLER FOR WINDOWS .

DOWNLOAD GOOGLE CHROME 55.0.2883.87 OFFLINE INSTALLER FOR WINDOWS ...


GOOGLE CHROME IS ONE OF THE BROWSER FOR PC.

Google's game changing browser Chrome combines sophisticated technology with a simple UI, to create a faster, safer and easier browsing experience. Launched in 2008, Google Chrome quickly dominated the browser market to become the most used browser globally within 4 years of its public release. Google’s rapid and continuous development cycle ensures the browser continues to compete with the other most popular and advanced web browsers available


SCREENSHOTS :-


                     -: PROOF OF OFFLINE INSTALLER  :-


download google chrome offline installer just click on the download button given below :-

google chrome offline installer


REMEMBER WE JUST PROVIDE FREEWARE SOFTWARE OR FREE TRIALS .
WE DO THIS BECAUSE WE KNOW SOME PEOPLE USUALLY HAVE PROBLEM OF GETTING THEM FROM OFFICIAL WEBSITE. PROBLEM MAY BE BECAUSE CONNECTION PROBLEM, WEBSITE CRASHES ,OR MANY OTHER PROBLEM.
BY DOING THIS WE HELP THOSE USERS.
                         
                                               JAATSTUFF